Introduction
Firewall rule changes and resulting issues are the bane of most Data Centre Migration teams’ lives. On many DCMs there will be multiple waves of migration and as a result systems in the old DC may need to communicate with migrated servers in the new DC and vice versa. As any issues that occur at the cut-over time will be pressing and typically can’t all be parked in the network team’s queue for later investigation and resolution. Clearly it is best to avoid Firewall issues during cutover by testing rule in advance. On several DCMs I have been involved with I have run some short tutorial sessions to arm the application migration teams with some basic tools and techniques to help them identify firewall issues. One of the simplest tests is the so called “telnet” test. In this post we look at this test in some detail and also provide some information as to what is going on behind the scenes. You don’t need to know the behind the scenes stuff to use the test but I think it helps to know it.
Basic concepts
Lets start with some background and concepts starting with the TCP protocol and how many firewalls work with it. If you know this stuff already or are just keen to get to the test you can skip straight to the test section.
TCP
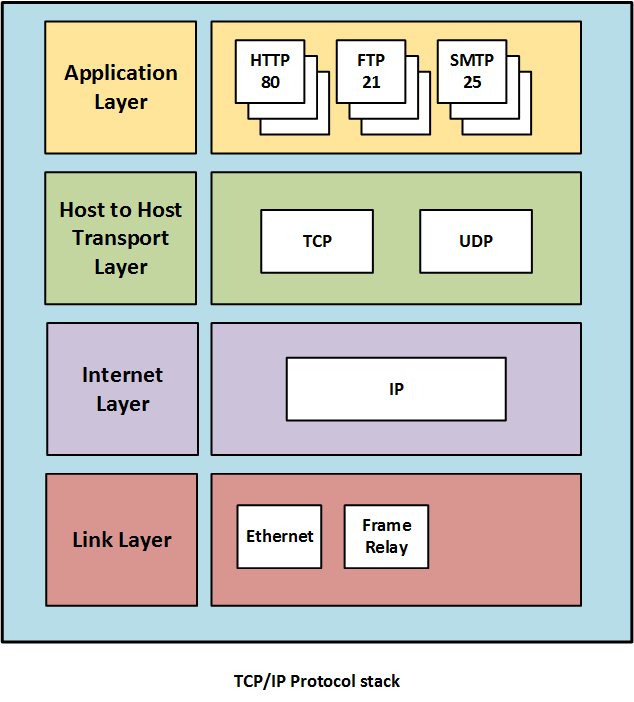
These days most application level protocols are carried using the Transmission Control Protocol. For example HTTP, SMTP, FTP and Telnet all use TCP as their Transport Protocol (TCP in turn is carried across the network by IP packets). The diagram below shows a conceptual view of the entire TCP/IP stack and shows where various common elements sit (click to enlarge)
TCP provides what is known as a “reliable” transport protocol. This means that it attempts to protect its users from untoward events that happen in the underlying networks, such as packet loss or corruption. If packets are lost in transmission TCP will detect that and request a retransmission from the remote server without any intervention from the application making use of TCP. The basis for all the measures that TCP uses to do this is establishing and tracking a “connection” or “session” between the two end point computers that are attempting to communicate with each other. Along with the connection goes a whole load of data that tracks the connection and ensures that an application receives data in the order that it was sent and also that it does not receive duplicates. Of course there may be errors that TCP cannot recover from, in which case it signals this to the application and terminates the connection. This still constitutes “reliable” behaviour. Contrast this with another transport protocol used on TCP/IP networks, UDP (User Datagram Protocol). This is not a reliable protocol and each packet sent out is “fire and forget” with UDP doing nothing to recover from network errors. In this tutorial I will restrict the discussion to TCP which is far and away the most common transport protocol.
Port Numbers
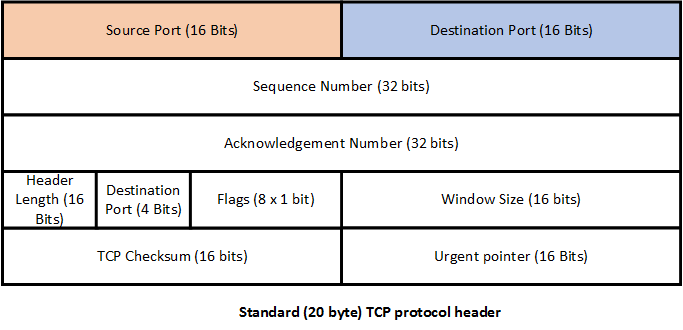
In addition to the source and destination IP addresses used to set up a connection TCP, and other protocols, use the concept of Port numbers to identify both the source and destination applications. Port numbers are 16 bit numbers so the range is 0-65535. If we look at the TCP protocol header we can see that 2 16 bit fields are present to hold the source and destination port numbers (click to enlarge)
Let’s look at ports in a bit more detail.
Well Known ports
Major protocols typically have a “Well-Know” port associated with them. For example HTTP uses port 80 (by default). When you enter a URL in a browser, for example http://www.dcmigration.co.uk your browser will use TCP and attempt a connection to port 80 on the target web server dcmigration.co.uk. These “Well-Known” ports range from port number 0 to 1023. They are, for the most part, used by common internet standard protocols. Port allocation, amongst other things, is managed by an organisation called IANA (Internet Assigned Numbers Authority).
Registered ports
The port range between 1024 and 49151 are referred to as “registered ports”. The official process is that any software vendor wanting to use a port in this range should register it with IANA. There may be some overlaps in the real world as software companies need to stick with the port numbers they used for the products before the registration process came into effect. They are therefore referred to as being semi-reserved.
Dynamic or Ephemeral ports
The port range 49152-65535 are referred to as dynamic “ephemeral” ports. They are typically used when it does not matter what port number is used. They are intended, as the name ephemeral suggests, for temporary relatively short lived connections. Further they are typically used as a source port numbers as they are allocated somewhat randomly it would be difficult for another computer to initiate a connection to them as the port number will not be known to the initiating party.
TCP connections
TCP connections are uniquely identified using 4 pieces of data. These are the Source IP address and port and the Destination IP address and port. It is easy to think of a situation where most of the data may be the same. For example let’s say we have 2 different users logged on to a Linux box 192.168.2.50 at the same time. They both decide to start a telnet session to another Linux computer, 172.16.45.10. So in this scenario the source IP address for both connections is the same. The destination IP address and port number are also the same. The tie breaker that makes these two connections unique is the source TCP port. This will be different for both connections and will almost certainly be a port number allocated from the dynamic or ephemeral range of port numbers.
Packet filtering Firewalls
OK so now we know about TCP ports and also about the data that identifies a TCP connection. Packet filtering firewalls, in their simplest form, block or allow traffic based on the source and destination addresses and ports. The information for connections is entered as one or more firewall rules. The rule I have set up in the lab for this post is shown below (click for a larger image)
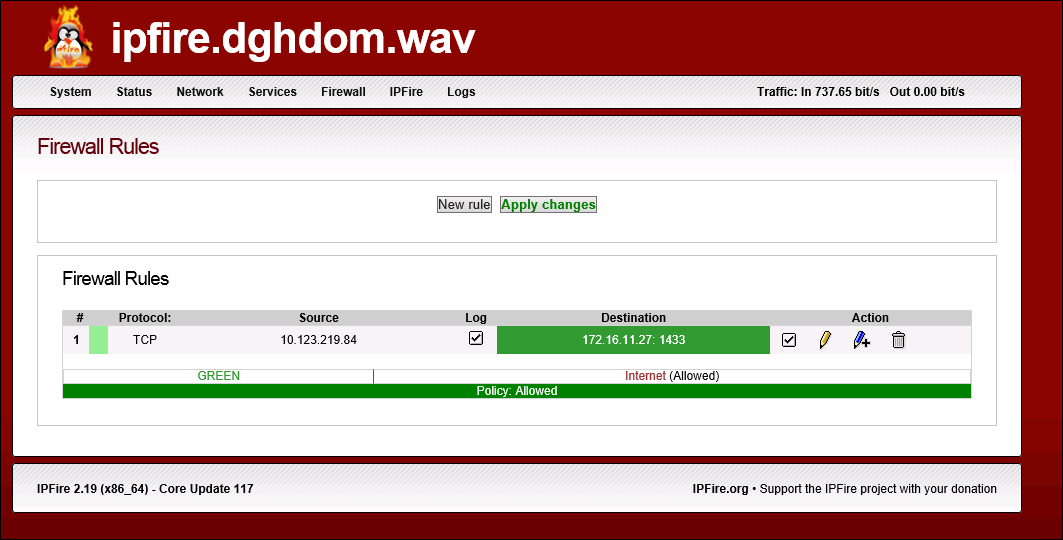
In fact usually the firewall does not care about the source port because, as we have said, this is usually a port assigned from a random range at the time the connection is established, so whoever created the firewall rule would have no way of knowing what it will be. Indeed it will almost certainly be different for each connection. So as you can see in the rule above there is no source port specified. By default firewalls will typically block anything they don’t have a rule for.
Carrying out the test
OK theory over, let’s take a look at how we can carry out some simple tests to see if our fire wall rules are working correctly. As an aside, it should go without saying that if you can do a simple application level test, such as accessing a web server via a browser you should do so. What the “telnet” test allows us to do is test the firewall rules even if we don’t have application client software installed on the system we are running the test from. It also means that the person carrying out the test does not need to know how to “drive” the application being tested. Another thing to mention is the fact that that we are doing this testing in the context of a DCM. That is to say the application is working in the source environment. Therefore, depending on how the server was migrated, we should be able to ignore things like the embedded windows firewall or iptables settings on Linux as they should be the same.
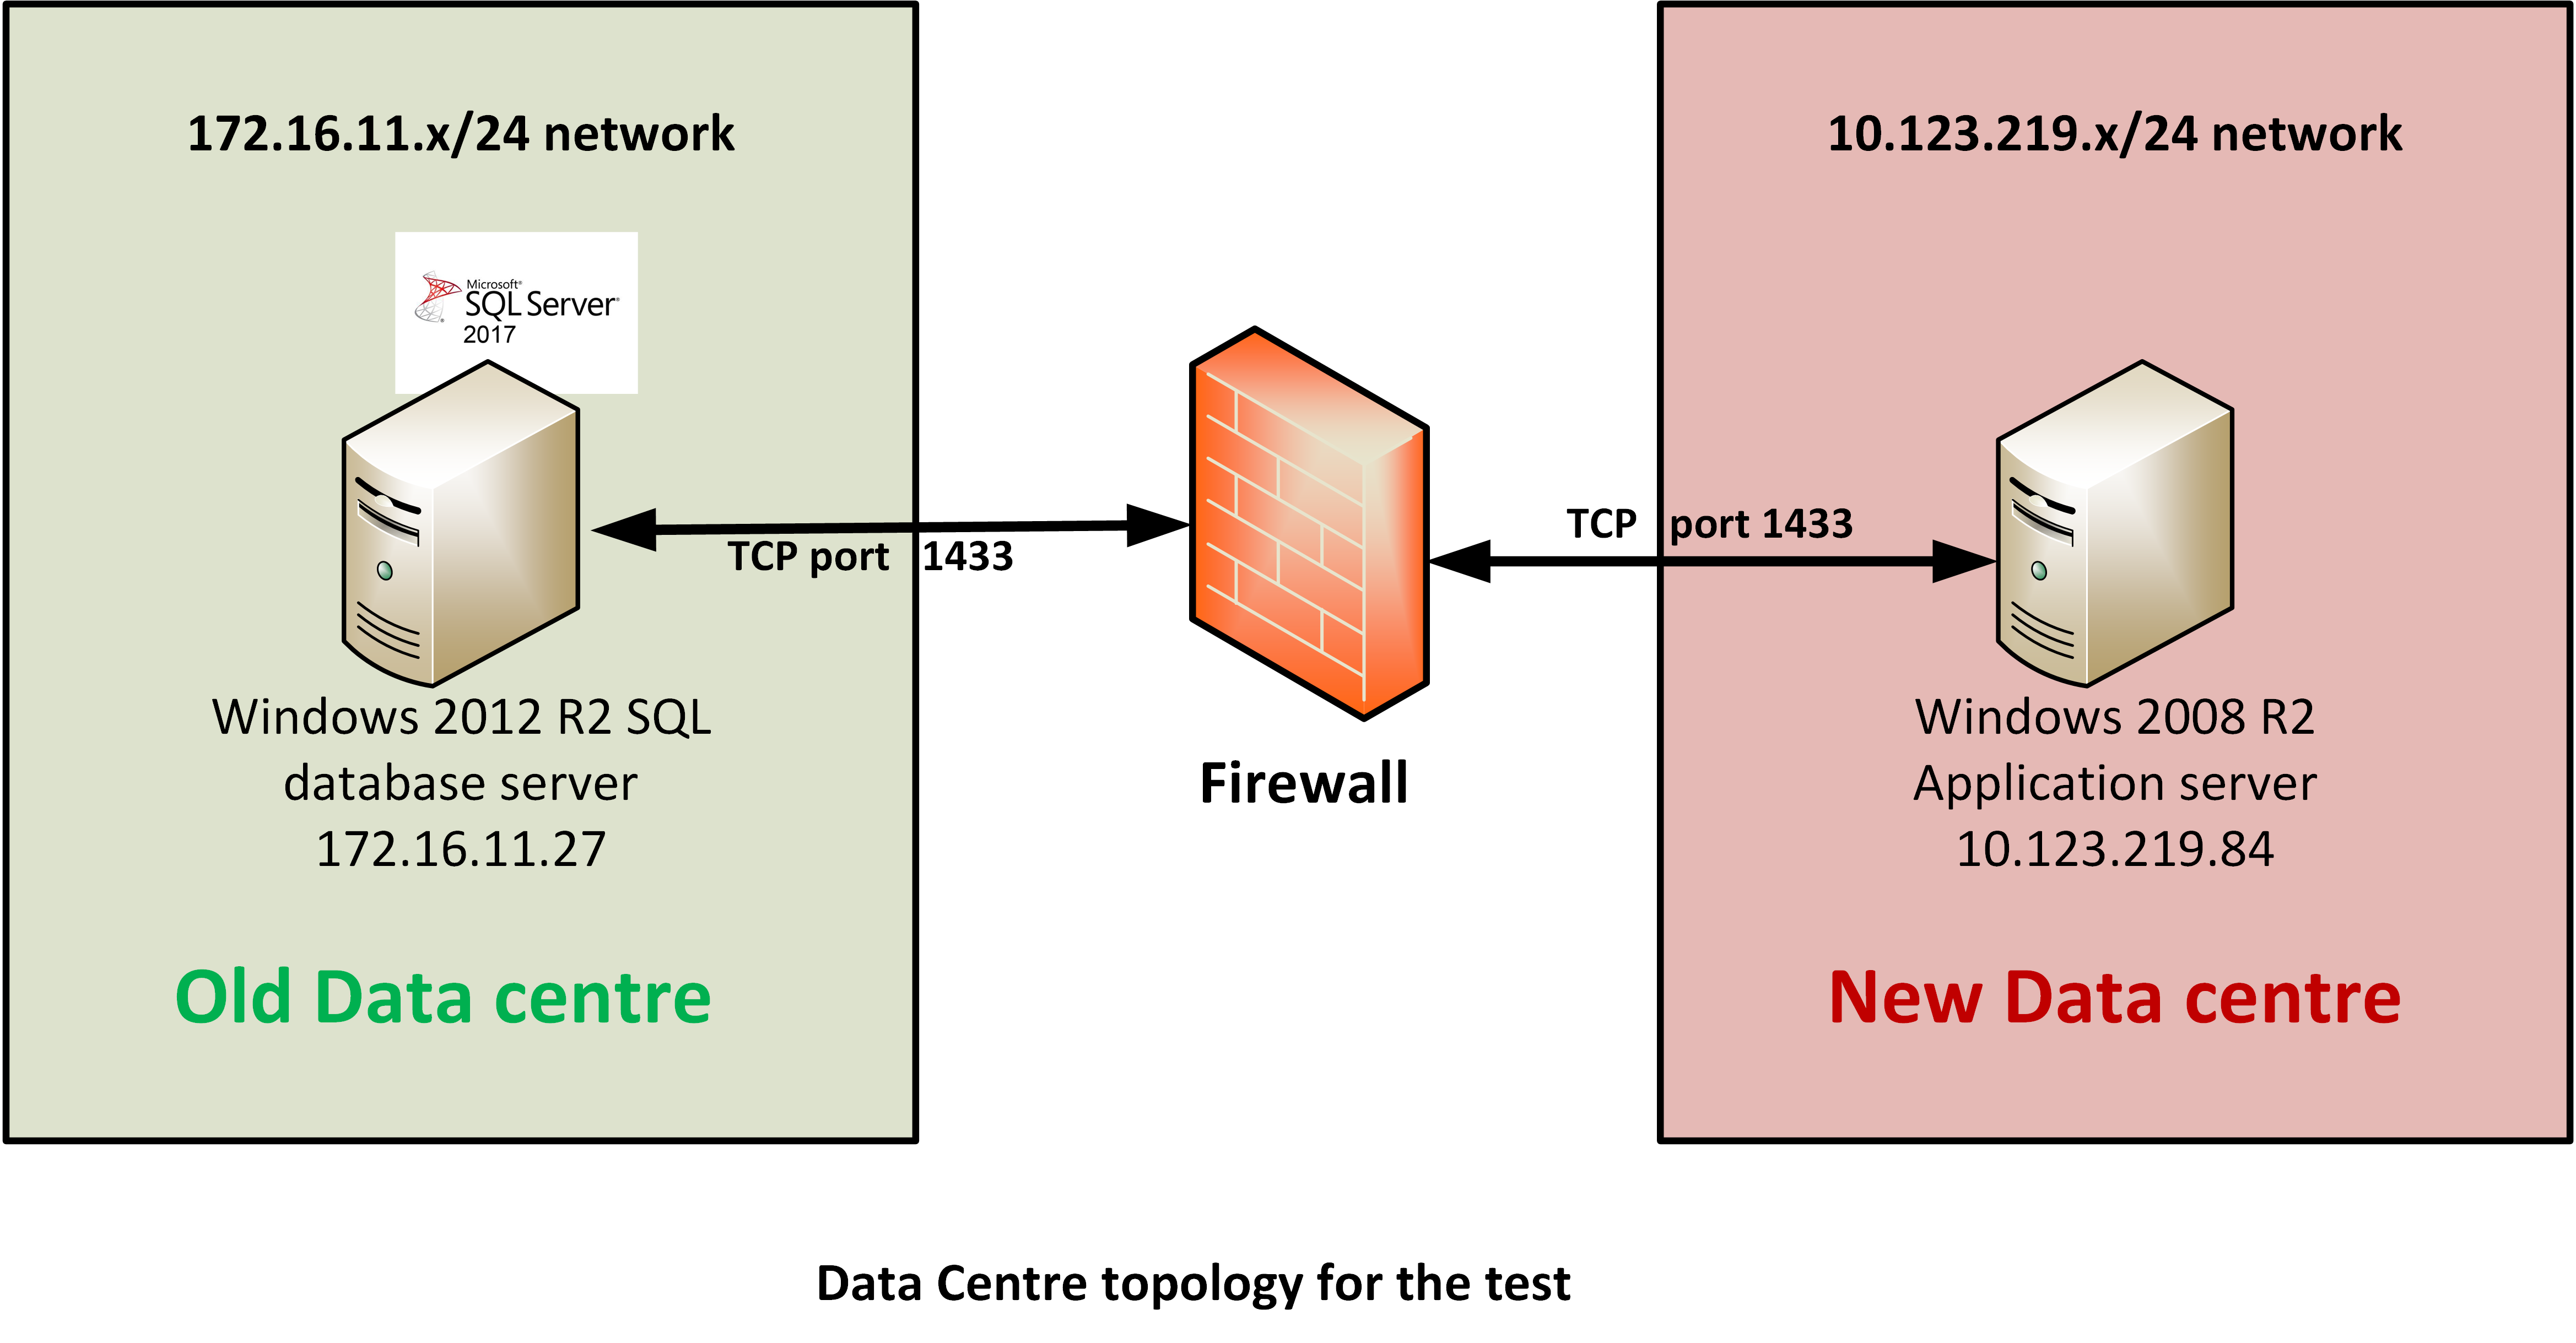
For these tests I have setup a fairly simple configuration in our VMware lab. The scenario is an App server in the new Datacentre needing to talk back to a SQL Server Database that is still in the old Datacentre. So in the new Datacentre (pink shading in the diagram below) we have a Windows 2008 R2 system sitting on the IP subnet 10.123.219.x/24 with an IP address of 10.123.219.84. This is, or will be, our application server in the new Datacentre. It needs to talk back to Windows 2012 R2 system running SQL server 2017 sitting on the IP subnet 172.16.11.x/24 with an IP address of 172.16.11.27. Sitting between these 2 subnets is a firewall (I am using a Linux based IPFire firewall as this is easy to set up in a virtual lab). I should stress that you need to execute the test between the two systems that the firewall rule or rules should have been set up for. A connection to a default SQL Server instance uses TCP port 1433. Note that SQL Server named instances can use a dynamic port allocation mechanism but we will stick to the simple case for this post.
This example configuration is fairly simple. In the real world your traffic may need to pass through multiple firewalls before it gets to the target system but the same principals still apply.
Why Ping usually won’t cut it
The popular “ping” command uses the Internet Control Message Protocol (ICMP). ICMP is part of the IP protocol, in effect a protocol within a protocol. ICMP is used to perform network diagnostic and control functions. An operating system “ping” command sends an ICMP echo request packet to the server you are trying to ping which will usually respond with an ICMP echo reply message. However, on lots of corporate networks firewalls are set up not to pass ICMP echo requests. In any event as we are trying to test connections to particular application TCP ports even if a ping to a server were successful it does not prove that a firewall is not blocking our application port connections.
The “Telnet” test
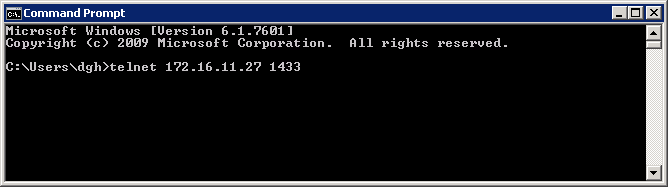
One of the simplest tools to test connectivity through firewalls is telnet. Its power comes from the fact that you can specify an optional TCP port number on the telnet command line. By using an application port number rather than Telnet’s standard port number of 23. Telnet is available on most operating systems including Windows, Linux, Solaris and AIX. The examples I show here are performed using Windows but pretty much everything applies to the other OS platforms. The basic form of the command we use for these tests is
c:\>telnet <IP or DNS name> <Port-number>
Note that there is a possibility on a Windows system that the telnet client feature is not installed. This can be rectified by going to the “Programs & Features” section in the control panel selecting “Turn windows Features on or off” and from there enabling the telnet client
Case 1: Firewall is not allowing the connection
We use command line telnet on the initiating computer to try to connect to our SQL server. The example shown here is Windows but the process is identical for Linux and UNIX systems.
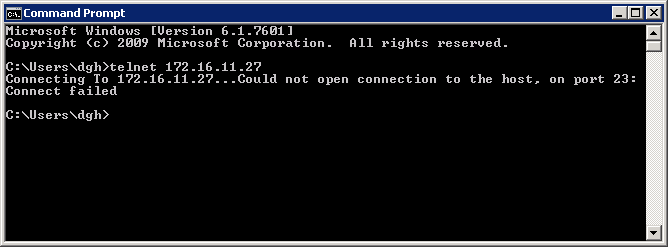
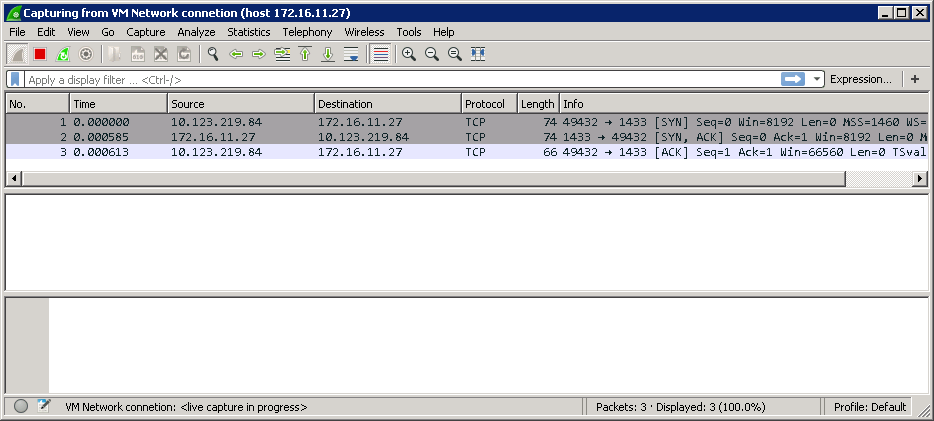
 What the screen capture above does not show is that there is a delay after “Connecting To 172.16.11.27…” before we get the “Could not open connection” message. In my lab this delay is around 25 seconds. TCP does not know it is being blocked by a Firewall and in keeping with it being a “reliable” protocol, when it does not get a response it retries a number of times before it gives up. A Wireshark capture shows us what is going on behind the scenes. The red on black background lines in the capture below show TCP retransmitting its connection request. Notice that in the Wireshark trace there is no sign of any messages coming back from 172.16.11.27. Don’t worry about the Wireshark capture it’s not needed for the test, it just shows what is happening in more detail (Click for a larger image)

So in summary if you telnet to a particular port on a remote server and we get a “Connection failed” message after about 30 seconds something, probably a firewall, is not letting the connection through.
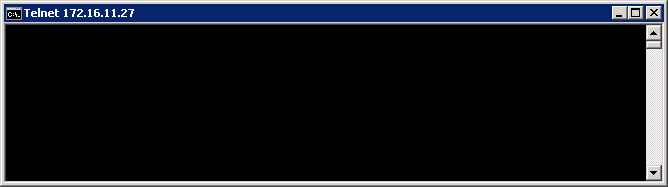
Case 2: Firewall is allowing the connection
Once again we use exactly the same telnet command to try to connect to the Database server specifying port 1433
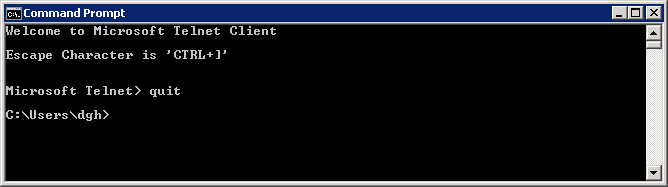
In this case the firewall rule is in place correctly and the next thing we see is a blank screen. What this means is that telnet has established a connection to port 1433 on the server 172.16.11.27
Again if we look behind the scenes using a Wireshark capture we can see that our app server and the database server are indeed talking to each other with messages coming back from server 172.16.11.27 (click for a larger image)
Note that the SQL Server does not “speak” the Telnet protocol. All we are doing is using Telnet on a non-standard port to see if we can get a TCP session created, which happens on all TCP connections before any actual application protocol chat takes place. If we can do that any firewalls on the path between us and the Webserver are allowing the traffic through. Once we get to the “blank screen” stage we have proved that we have connectivity. To shut down the telnet connection you can type Control and “]” (right square bracket) to communicate with the telnet program itself. When you get to the “Microsoft Telnet>” prompt type “quit”
Case 3: Firewall is allowing the connection but the port is not active on target server
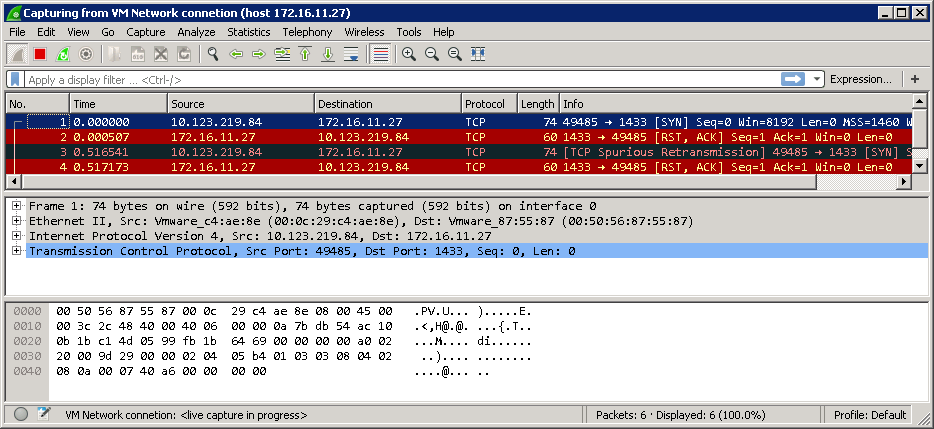
There is a third scenario where the firewall rules allow the traffic to pass but the port is not actually active on the target server. For example SQL Server may not be running or even installed. We use the same test and the results as shown below look identical to Case 1. However the difference is that we get the “Connect failed” message quickly, in around 2 to 3 seconds.
What we can infer from this is that the server 172.16.11.27 is talking back to us but for some reason is not accepting the connection. The Firewall rules are allowing traffic to pass to our required TCP port. In this case a Wireshark trace does show us something we can only guess at from the Telnet test and you can see from the trace that the server at 172.16.11.27 is sending back a RST (reset) message. Basically it’s saying it does not want to or is not able to talk on that port. Astute readers will notice that the Telnet TCP end is in effect ignoring the RESET and keeps resending the connection request a few times. Each one of these reconnection attempts is immediately responded to with a RESET message from the target server. The Wireshark trace is shown below (click for a larger image)
Conclusion
The power of the Telnet test is that it can be used to test pretty much any protocol that uses TCP as its transport. Also although we have carried out a deeper dive here the basic testing process is very simple and can be used by team members with little or no in-depth network knowledge. Having said that I have, in passing, touched on the use of the Wireshark tool a few times in this post. In Part 2 of this post I will be going in to the use of Wireshark and the similar Tcpdump in more depth in a DCM testing context.